Connect NinjaOne (NinjaRMM)
NinjaOne (formerly NinjaRMM) is a remote monitoring and management (RMM) platform for endpoint monitoring, patching, and remote access. Connecting NinjaOne to StackJack gives your AI assistant tools…
Written By Christopher Scaminaci
Last updated 2 days ago
NinjaOne (formerly NinjaRMM) is a remote monitoring and management (RMM) platform for endpoint monitoring, patching, and remote access. Connecting NinjaOne to StackJack gives your AI assistant tools for devices, organizations, alerts, patching, maintenance mode, scripting, and fleet analytics through StackJack's MCP endpoint. See the generated NinjaOne tool reference for the current inventory, input schemas, plan tiers, and safety notes. (MCP, the Model Context Protocol, is the open standard that lets AI assistants like Claude, ChatGPT, and Copilot call your MSP tools securely.)
NinjaOne is one of only two connectors (the other is HaloPSA) that offers a choice of two authentication methods:
⚠ Running scripts, reaching ticket boards, adding ticket comments and creating tickets require Authorization Code (OAuth). NinjaOne treats these, and various other endpoints, as user-context operations: each one must be done by a signed-in NinjaOne technician, and NinjaOne records it under that technician's name. A Client Credentials machine token has no user context, so
ninja_run_script, ticket-board tools,ninja_add_ticket_commentandninja_create_ticketfail with auser_context_required(HTTP 403) error no matter whatrunAsvalue you pass. This is a NinjaOne rule, not a StackJack permission gap, and StackJack does not count it against your connection: the connection stays enabled and your other NinjaOne tools keep working. If you want your AI to do any of these, connect with Authorization Code (User OAuth); team members can then add their own NinjaOne sign-in (see Per-user connections) so their comments and tickets carry their own name. Read-only tools work with either method.
Before you begin
- You need the Owner, co-owner, or Administrator role in StackJack to configure connectors. Other team members can't edit connector settings — they use the Your personal sign-ins section of the Connectors page instead (see Per-user connections below).
- You need admin access to NinjaOne (the ability to create API applications under Administration > Apps > API).
- Connecting a connector automatically activates it on the Free plan. You can upgrade to a paid plan at any time from the Connectors page — current pricing is shown in the portal.
- Know your NinjaOne region. StackJack supports US (app.ninjarmm.com), US2 (us2.ninjarmm.com), EU (eu.ninjarmm.com), OC (oc.ninjarmm.com), and CA (ca.ninjarmm.com). If your organization uses NinjaOne Branding, your API application works only on your branded address (for example
yourcompany.rmmservice.com), and no region address accepts it. StackJack supports the five branded endings:.rmmservice.com,.rmmservice.eu,.rmmservice.ca,.rmmservice.com.auand.rmmservices.net(with an s, for the US2 region). The ending depends on your NinjaOne region.
Tip: The same steps below are always available in-app — open Connectors, find the NinjaOne card, and click How To Connect.
Option A: Authorization Code (User OAuth) — recommended
Step 1: Create the OAuth application in NinjaOne
- In NinjaOne, go to Administration > Apps > API and create a new client application.
- Select Web as the Application Platform and Authorization Code as the grant type.
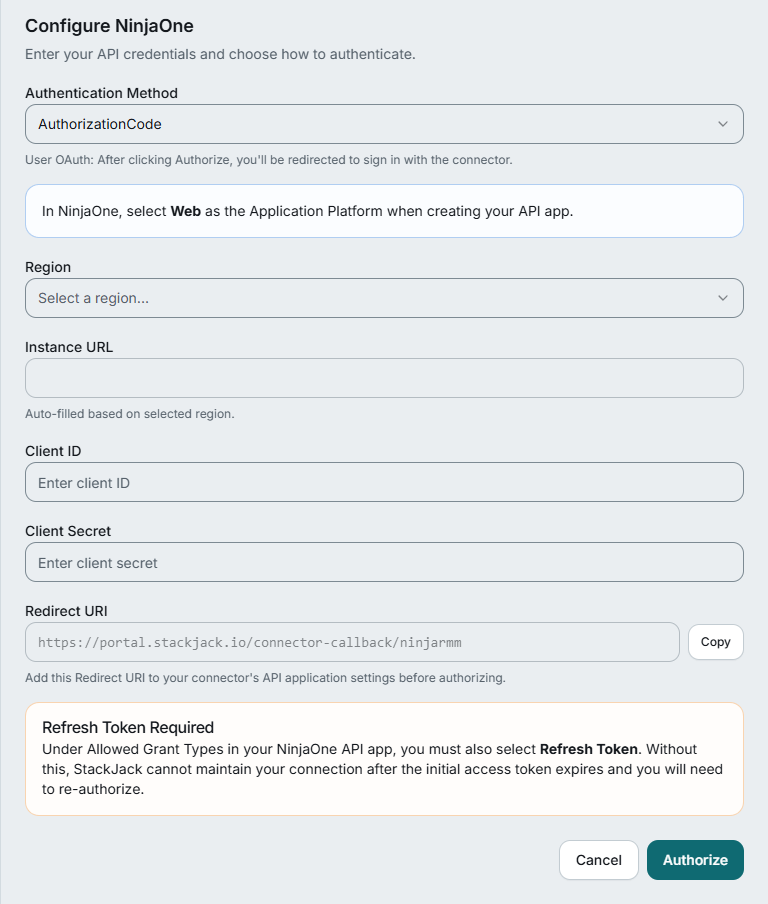
- Under Allowed Grant Types, also select Refresh Token.
⚠ Refresh Token is required. Without the Refresh Token grant, StackJack cannot maintain your connection after the initial access token expires, and you will have to re-authorize repeatedly. StackJack refuses to complete the connection if NinjaOne doesn't return a refresh token, and points you back to this setting.
- Set the Redirect URI to the StackJack OAuth callback URL shown in the connector setup form (you'll copy it in Step 2 — it looks like
https://<your portal address>/connector-callback/ninjarmm). - Select your API region (or Branded address, if your organization uses NinjaOne Branding) and enable the required API scopes (monitoring, management).
- Copy the Client ID and Client Secret from the application details page.
Step 2: Authorize in StackJack
- In the StackJack portal, go to Connectors and click Configure on the NinjaOne card.
- Set Auth Method to Authorization Code (User OAuth) — Recommended (this is the default for a fresh setup).
- Select your Region — the Instance URL fills in automatically and can't be edited. If your organization uses NinjaOne Branding, select Branded address instead, type the first part of your branded address (for example
yourcompany), and pick the ending next to it. StackJack builds the address for you, so you never paste a full URL. - Copy the Redirect URI shown in the dialog and make sure it is registered on your NinjaOne API application (Step 1.4) before continuing.
- Paste the Client ID and Client Secret.
- Click Authorize. You'll be redirected to NinjaOne to sign in and approve access, then returned to StackJack.
When you connect with OAuth, StackJack requests the monitoring and management scopes (plus offline access for token renewal). Scope selection checkboxes are not shown in OAuth mode — the scopes enabled on your NinjaOne application control what's actually granted.
Option B: Client Credentials
Step 1: Create the API application in NinjaOne
- In NinjaOne, go to Administration > Apps > API and create a new client application.
- Select API Services as the Application Platform and Client Credentials as the grant type.
⚠ The Application Platform must be API Services for Client Credentials. (For OAuth it must be Web.) Picking the wrong platform is the most common cause of a failed connection.
- Enable the API scopes you want StackJack to use (see the scope guide below).
- Note your API region, or your branded address if your organization uses NinjaOne Branding.
- Copy the Client ID and Client Secret from the application details page.
Step 2: Save the credentials in StackJack
- In the StackJack portal, go to Connectors and click Configure on the NinjaOne card.
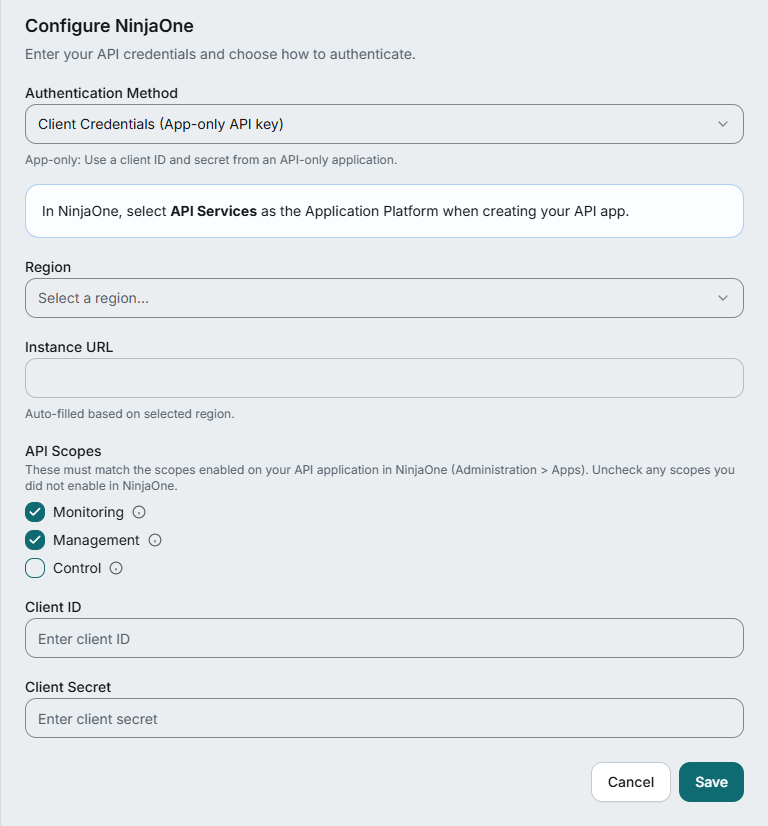
- Set Auth Method to Client Credentials.
- Select your Region — the Instance URL fills in automatically. If your organization uses NinjaOne Branding, select Branded address instead, type the first part of your branded address (for example
yourcompany), and pick the ending next to it. - Paste the Client ID and Client Secret.
- Check the API Scopes boxes (Monitoring / Management / Control) to match exactly the scopes you enabled on the NinjaOne application. At least one scope is required. StackJack requests exactly the checked scopes every time it authenticates to NinjaOne, so the checkboxes must mirror the NinjaOne app: checking a scope the app does not have can make authentication fail, and unchecking a scope you do need means the tools that require it fail with permission errors (the tools themselves stay visible in StackJack).
- Click Save.
NinjaOne API scopes
Giving end users access to devices
NinjaOne lets an end user see and reach only the devices they have been given access to. Ask your AI to "give end user 42 access to devices 10 and 11" or "take device 12 away from end user 42" and StackJack calls NinjaOne's device access setting for that person (ninja_update_end_user_device_access). One call can carry up to 100 devices, adds and removals together. It is a Management action on a Pro plan, and because it widens or removes what a person can reach, your AI asks you to confirm it first.
This is separate from device ownership (who is responsible for a device, ninja_set_device_owner) and from editing the person's profile (ninja_update_end_user). To see which devices someone can access today, ask for the end user (ninja_get_end_user): the answer lists accessibleDeviceIds (devices they can access) and assignedDeviceIds (devices assigned to them). NinjaOne publishes no separate read for it.
Creating an end user can also send NinjaOne's invitation email in the same step (sendInvitation), and the organization's end-user list can include each person's roles (includeRoles). Technician roles can be given per-organization access (ninja_set_user_role_organization_permissions), also a confirm-first Management action.
Single sign-on (SSO) and SCIM are not available through StackJack. NinjaOne's public API has no operations for identity providers, and its SCIM endpoint is a separate service that a customer's identity provider (Entra ID or Okta) calls with its own secret token, not part of the API a StackJack connection uses. Set both up in NinjaOne under Administration > Accounts > Identity Provider. What StackJack can show you is the result: an end user's authType (native or SSO) and whether scimUser created them.
Anything the named tools do not cover
Two tools, ninja_raw_get (reads, any plan) and ninja_raw_request (writes: POST, PUT, PATCH or DELETE, Pro plan, confirm-first), send one call to any NinjaOne API path starting with v2/ and return NinjaOne's answer untouched. Use them for a route NinjaOne added after StackJack's tool list was written. The named tool is always better when there is one: it checks its input, caps the page size and says what the answer means. The raw tools take JSON only (no file uploads, and a route that answers a file is refused with the signed-link tool to use instead), and answers over 16 MB are refused so you can narrow the request. You can switch this pair off for your organization under the connector's tool permissions.
What happens when you save
- Your credentials are stored encrypted in Azure Key Vault. They are never stored in StackJack's database, and the portal never re-displays a saved secret.
- StackJack immediately test-calls NinjaOne to validate the credentials. If validation fails or times out, your credentials are still saved and you'll see a warning — validation retries automatically in the background.
- A Free plan subscription for NinjaOne is activated automatically if you don't already have one.
- If validation keeps failing (three consecutive definitive failures), StackJack auto-disables the connection, emails the tenant owner, and shows Re-enable and Update Credentials buttons on the card.
Per-user connections for team members
With the Authorization Code method, each team member can attach their own NinjaOne identity so tool calls run as them:
- An admin completes the shared OAuth setup above first.
- The team member opens the Connectors page and selects Connect on the NinjaOne card in their Your personal sign-ins section. Members inherit the scopes from the shared setup.
- The member signs in to NinjaOne with their own account and approves access.
- On the member's first NinjaOne sign-in, StackJack then shows a one-time credentials page with a personal MCP client (ID + secret) named after the member, for use in their AI tool. The secret is displayed exactly once, and the page expires after 5 minutes — copy it immediately.
- When the member signs in again later — Re-authorize or Reconnect on the card — StackJack renews the sign-in and keeps the MCP client they already have. No new client is created, no credentials page is shown, and nothing changes in their AI tool. StackJack also updates that client's tool list to the member's current tools. A member who lost the secret can select Revoke my key on the card; their next sign-in then creates a new client and shows it once.
Members must have at least one NinjaOne tool assigned to them by an admin before they can connect. If a member's NinjaOne authorization later breaks (for example, a revoked refresh token), their personal sign-in card shows Re-authorize Required with a button to reconnect, and the member receives an email when re-authorizing is the fix. If NinjaOne refuses the organization's application instead (for example, its client secret changed), the card shows Administrator Action Required: an owner or administrator fixes the organization's NinjaOne connection first.
Troubleshooting
Disconnecting
Click Disconnect on the NinjaOne card to delete the stored credentials from Key Vault. Any AI tools using the connector stop working immediately.
⚠ Disconnecting does not cancel a paid plan — billing continues until you cancel it separately. The plan controls only appear while the connector is connected, so end the plan before disconnecting. On a paid connector that button reads Manage on Billing and opens this connector's removal dialog on the Billing page; a legacy website subscription still reads Cancel Plan. If you've already disconnected, save your credentials again to bring the plan controls back, then end the plan.
NinjaOne (NinjaRMM) tools
ninja_ · 274 tools · Free 108 · Pro 166
Organizations
Devices
Custom Fields
Alerts
Activities
System
Users
End Users
Device Management
Queries
Advanced Management
Ticketing
Policies
Scripting
Documentation
Analytics
System Lookups
Node Roles
Management
Webhooks
Knowledge Base
Checklist Templates
Organization Checklists
Organization Documents
Document Templates
Asset Tags
Custom Field Administration
Related Items
Software Licenses
Unmanaged Devices
Backup
Custom Tabs
Vulnerability Management
Raw Requests
Was this helpful?
Still need help? Ask the team