Connect Addigy
Addigy is a cloud-based Apple device management (MDM) platform for MSPs — it manages macOS, iOS, iPadOS, and tvOS devices. Connecting it to StackJack gives your AI assistant addigy_ MCP tools covering…
Written By Christopher Scaminaci
Last updated 6 days ago
Addigy is a cloud-based Apple device management (MDM) platform for MSPs — it manages macOS, iOS, iPadOS, and tvOS devices. Connecting it to StackJack gives your AI assistant addigy_ MCP tools covering devices and facts, policies, MDM commands and profiles, software deployment, monitoring and alerts, compliance, and more. See the generated Addigy tool reference for the current inventory, input schemas, plan tiers, and safety notes. MCP (Model Context Protocol) tools are the standardized commands an AI assistant can call through StackJack.
Two things make Addigy setup different from most connectors:
- The API token carries its own permissions. You choose exactly what the token may do when you create it in Addigy — and that choice is permanent for that token.
- Addigy enforces a severe rate-limit penalty. Exceeding the vendor's limit locks the token out of the API for 24 hours. StackJack's built-in pacing makes this unreachable from StackJack alone, but you should still read the warning below.
How StackJack authenticates to Addigy
Addigy API v2 uses a static API token sent with every request. There is no OAuth flow and nothing to refresh — the token alone authenticates every call, so treat it like a password. The base URL is fixed (Addigy is a global SaaS with no regional endpoints), so the token is the only thing you enter.
Before you begin
- In StackJack: you need a role that can manage connectors (tenant Owner, a co-owner, or an Administrator).
- In Addigy: your user needs View Integrations API Keys, Create Integrations API Keys, and Delete Integrations API Keys, plus access to Account → Integrations → API & Webhooks.
- Plan the token's permissions first — see the next section. Tokens cannot be edited after creation, so deciding up front saves you a second trip.
Choosing the token's permissions
When you create an Addigy V2 token, you select the permission categories it carries (device reads, policy edits, MDM commands, and so on). Two independent gates then apply to every AI call:
- StackJack's tool permissions — which
addigy_tools your plan and your tool selections allow. - The Addigy token's own permissions — what Addigy itself will accept from that token.
Both must permit an operation for it to succeed. If a tool call returns a 403 error, the token lacks that endpoint's permission — and because tokens are immutable, the fix is always to create a new token with the missing permission and update the credential in StackJack.
Use least privilege, but note that StackJack's Addigy tools span devices, policies, MDM, software, monitoring, and more — grant the areas you actually intend your AI agents to use. A note on naming, so the three vocabularies don't confuse you: Addigy's token-creation screen labels its permissions in plain language (View Devices, Execute Commands, Create MDM Profiles); the Addigy API reports a granted set as identifiers like com.addigy.devices.view (the addigy_get_api_key_permissions tool shows yours); and the categories below are StackJack's own permission categories, the ones the portal's Permissions page uses to map each tool. Match them to Addigy's screen by capability area:
The Permissions page in the StackJack portal maps each individual tool to the exact StackJack categories it needs — use it to decide which areas your token must cover, then grant the matching plainly-labeled permissions on Addigy's token screen. After saving, addigy_get_api_key_permissions lists what the token can actually do.
Step 1 — Create a V2 API token in Addigy
- Sign in with the three API-key management permissions listed above and navigate to Account → Integrations → API & Webhooks.
- In the Addigy API section, open the V2 tab and click New API Token.
- Choose the permissions to grant (see the section above).
- Copy the token immediately and store it securely — Addigy will not show it again. Anyone with the token has its full permission set on your Addigy organization.
Step 2 — Add the token in StackJack
- In the StackJack portal, open Connectors.
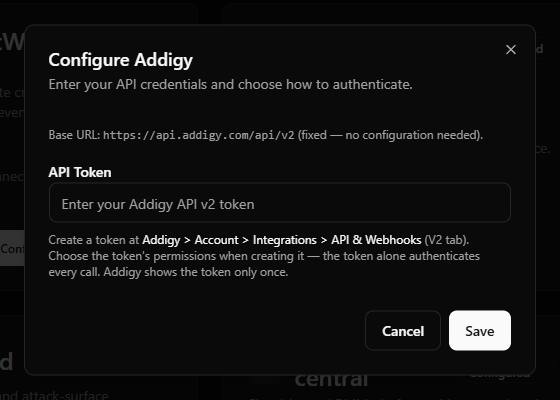
- Find the Addigy card. Click How To Connect for the same steps inline, or Configure to enter the credential.
- Paste the token into the API Token field. There is no URL to enter — the base URL is fixed at
https://api.addigy.com/api/v2. - Click Save.
What happens when you save
- The token is stored encrypted in Azure Key Vault — never in the StackJack database, and it is never shown back to you.
- If this is the first time you configure Addigy, a Free-tier subscription for the connector is created automatically so its Free tools work right away.
- StackJack immediately live-validates the token by asking Addigy for the token's own permission list. Validation never blocks the save: you'll either see a success confirmation or a "saved but validation failed" warning with the reason.
- The connector card shows the current connection and validity status from then on.
The 24-hour lockout — read this before pointing anything else at the token
Addigy enforces a hard limit of 1,000 API requests per 10 seconds — and once exceeded, it rejects all further requests for 24 hours. There is no early release.
StackJack applies its own conservative pacing (600 requests per minute per tenant), well below the vendor's burst ceiling. But Addigy counts all traffic using the token, not just StackJack's. To keep the lockout unreachable:
- Create a dedicated token for StackJack. Don't reuse a token that another integration, script, or dashboard also uses.
- If every Addigy tool call suddenly starts failing and your team runs other heavy Addigy integrations, suspect the lockout — it clears on its own after 24 hours.
Working with multiple Addigy organizations
If your Addigy account has child organizations, the tools support all three access patterns:
- Plain tools act on the organization the API token itself belongs to.
- Organization-scoped tools take an
organizationIdparameter to act on a specific child organization. Discover the IDs with theaddigy_list_child_organizationstool. - Aggregate tools accept a
multitenancyoption to span all child organizations in one call.
Aggregate tools call Addigy's Organization-Aggregate (/oa/) endpoints, which require an MSP parent-organization API token. A token issued for a single (non-parent) organization is rejected with a 400 Bad Request for these tools even though the token itself is valid — issue the StackJack token from your Addigy parent organization, or use an organization-scoped tool with an explicit organizationId instead.
Plans and available tools
- Free includes the read tools (device and fact reads, policy reads, monitoring reads, and so on).
- Pro adds the write tools — MDM commands, policy and profile edits, software deployment, and other state-changing operations.
- Business offers the same tool set as Pro with a higher monthly call quota.
Addigy has no per-user sign-in flow, so there is no per-user attribution — all AI traffic uses the shared token. Current pricing and quotas are shown in the portal's Billing page and at checkout.
Rotating or replacing the token
To rotate: create a new token in Addigy (with the same or updated permissions), paste it into Connectors → Addigy → Configure, save, and then delete the old token in Addigy. The StackJack save takes effect immediately, so there is no gap if you delete the old token afterwards.
Troubleshooting
Addigy tools
addigy_ · 255 tools · Free 119 · Pro 136
Devices
Organization & Users
Policies
MDM Commands
MDM Profiles & Settings
Custom Facts
End Users
Monitoring & Alerts
Software
Prebuilt Apps
Scripts & Maintenance
System Updates
Self Service
Compliance & Benchmarks
Integrations
Variables & Static Fields
Files, Exports & Reports
Community
Webhooks
Still need help? Ask the team